Monday 26 May 2014

Decoupage stamping card topper tutorial

Well lately i have had a bit of a tough time so i have not had time to blog, get into my creation cave or  get near my computer for that matter! It really has been a rollercoaster of crazy that is only calming down for a day or 2 then back to madness for a week! So while i have the chance to blog and craft i am grabbing it with both hands ;-)

I have recently discovered ProMarkers and i love them, i have been practising my shading technique and control. I have some gorgeous stamps that i wanted to combined with my new toys to really bring them to life.


What you need to get started...

Rubber stamp
Ink pad in black
ProMarkers
Scrap of White Card
Perspex Block


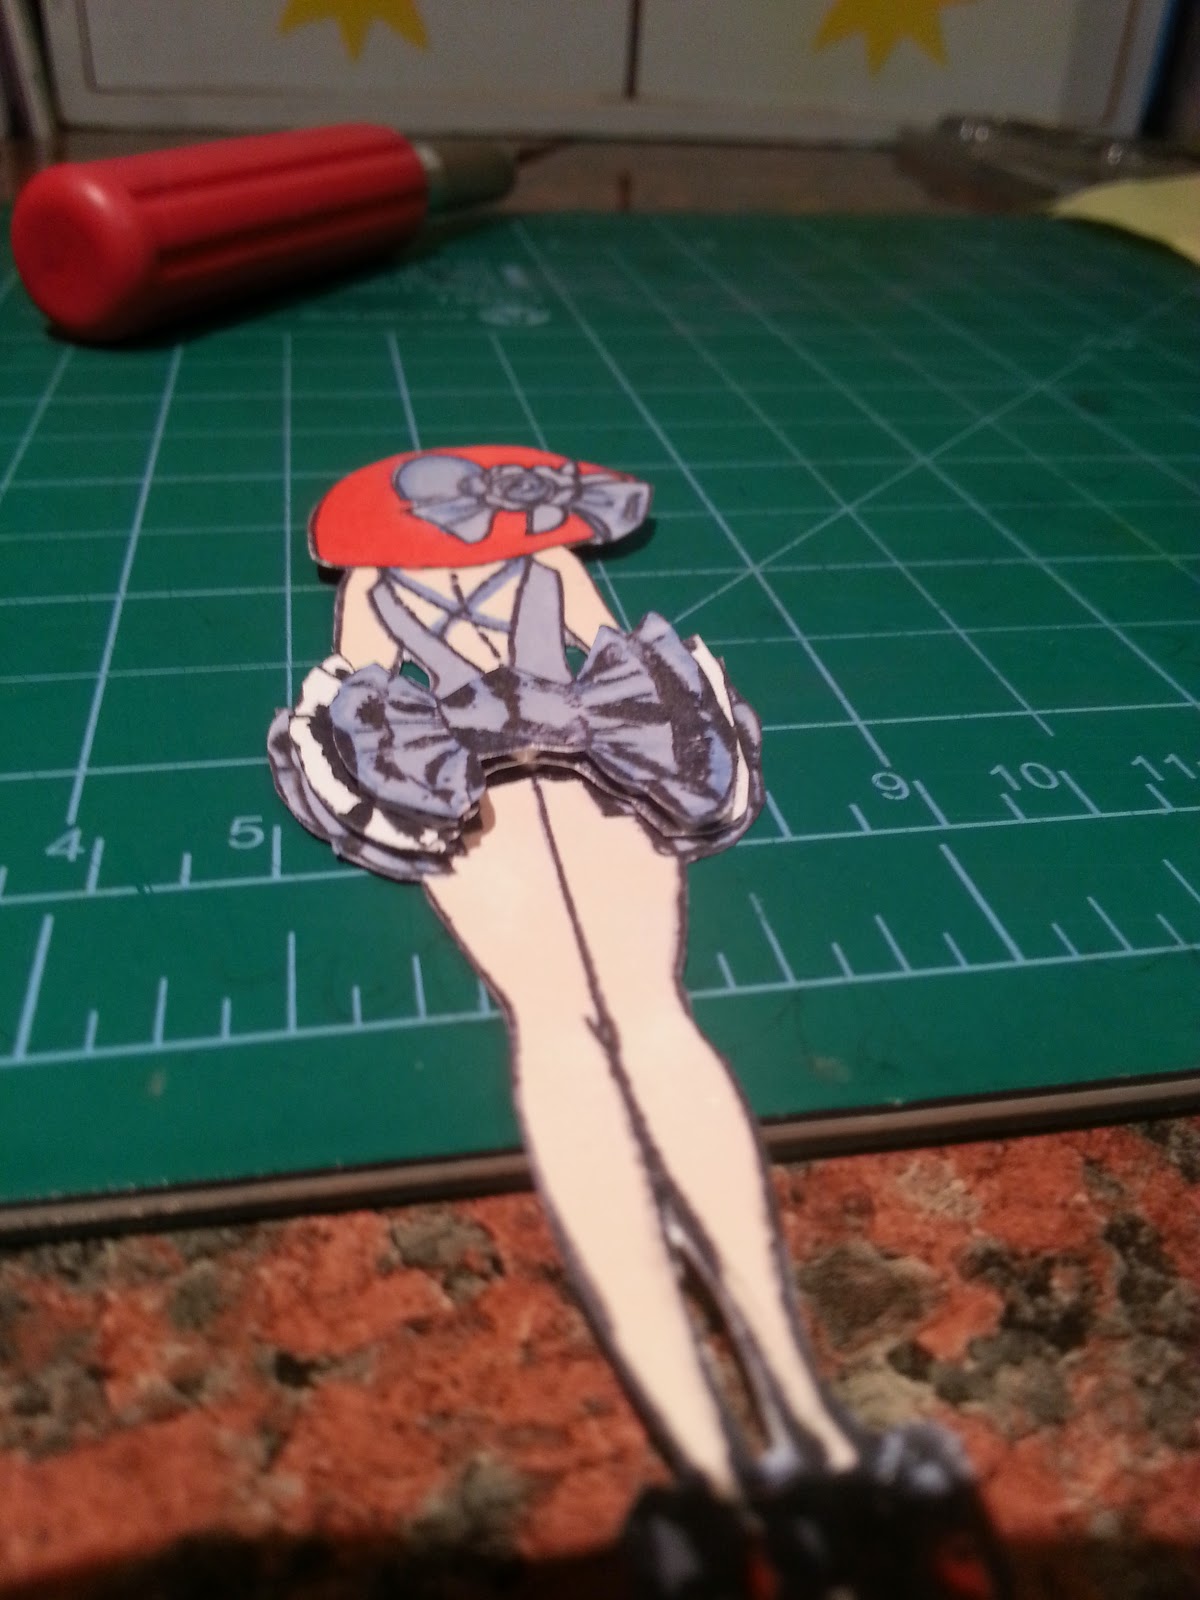
Stamp a full size image and then another 2 of the part you want to male into decoupage.


Select the colour ProMarkers you want to use, i am loving nautical colours at the moment.


Colour the full image, leave the middle one white and colour the piece to go on top identically to the full sized image.


Then cut them out with scissors and/or a craft knife, remember to cut the middle layer smaller than the full sized image and the top part smaller than the middle part to get a gorgeous 3D layered effect. I cut the ruffles on the skirt detail to get this effect. Once you have done this get some sticky pads and layer it up.


Once you have done this you are ready to make the mount :-)


What you will need for this....

Ink Pad of whatever colour you choose
Make Up sponge
Die Cut Oblong 
Sticky Pads
Liquid Pearls


Dab the sponge on the ink pad then press on the die cut to transfer the colour, i always make the corners darker when making these so it really stands out.


Now it's ready to attach your decoupage with foam pads.


Finally take some liquid pearls and add some in the corners, on the hat and at the back of the dress along with a sticky gem.


And that's it ready to attach to any card ;-)


Wednesday 21 May 2014

Newark Great British Papercraft Show Review

After winning 2 tickets in a competition for Newark Great British papercraft show i was over the moon, i have never really won anything for years and since getting into cardmaking i have won 3 competitions and challenges ;-) I would like to say a huge thank you to Sincerely Yours for the tickets, it was a lovely surprise and a fab experience.


I asked a few of my crafty buddies if they wanted to attend with me but they all had plans or had to go to evil work, so my poor partner got dragged along for the ride bless him. And to be fair he never moaned once, he just blended in with the sea of men outside the stalls holding their good ladies bags while us gals shopped till we dropped. I was like a kid in a sweet shop, so many new things and choices but also a few people that were to be honest rather rude and frightened you were getting a bargain they weren't. Also one not very helpful vendor who couldn't be bothered to help with some questions i had. As a new crafter i wanted to know about certain products and what they do, If i had of had some information i required then i would of made a purchase but decided to go elsewhere with my money to someone that was interested i was getting the right product for my needs. It got to the point i was elbowed, steamrolled and shoved out of the way on numerous occasions and while paying for my goods from one vendor and talking a little while doing so this woman barged up totally irrelevant to what was going on and rammed a pack of card in front of the poor sales ladies face while barking some orders at her asking why she didn't have something she wanted while another woman thought she was cutting in and started to have a go all while i am stood just waiting to finish paying for my goodies and move out of the way. All i can say is it's very very crazy but funny to if you can look at that way and laugh you will be fine. Just be prepared for a little argey bargey and a lot of randomness.


All that aside i did also meet some lovely people and vendors to at the event and one that was an absolute star was Clare from Cloudnine Crafts, Horncastle. She was doing some stamping demos and using pro markers which i had been curious about and was interested in trying out, so as i watched her demo i began to think i would like to give them a go. Whatever questions i had about technique, use, composition of the pen Clare happily answered all of my questions and was very helpful, knowledgeable and fun with it. We nattered about other crafty things, her shop (which is on the to visit list now) and her card making classes that i am going to go and also take part it very soon.


Her work is beautiful, i can't wait to take a class with her and invest in some more gorgeous goodies she has to offer!


I love the brown flower especially! 


So many pretties Clare has created.

If you fancy checking out some more of Clare's beautiful work pop over to her blog


Or if you are in Horncastle i would advise popping in to say hello at Cloudnine Crafts 3-5 Horsefair Walk, 22-24 The Bullring, Horncastle, Lincolnshire LN9 5HU
01507 526272

All in all for my first craft fair it was fun, interesting and expensive (but in a good way) I would advise to anyone that is into crafting to go and check one out and take many many pennies with them.


I came home with this little lot! Imagine what you will come home with :-) Thank you again to Sincerely Yours i would recommend attending one of their events which are held nation wide as they are well organised with ample parking, room to move in the venue and provide refreshment stands but most importantly they are lots of fun.


Happy Crafting Ems xxx


Tuesday 13 May 2014

Every crafts a pound!! Best website ever!

After another week of not feeling right i have been pretty quiet on the crafting front! I did however find the most amazing craft supplies site on the whole of the tinterweb. I give you Every Crafts A Pound :-) the best kept secret i have ever stumbled across and now i'm sharing it with the world!

After browsing through the website it was clear i was going to be sending a nice little amount here. The first option on the home page under product categories goes by the title Everything Under £1 which makes me a very happy crafter. As i look through the page at the goodies i spot lots of familiar names stocked in high end craft shops such as dovecraft, neighbourwood, Grace Taylor and so on. What makes me smile even more are the prices, items from just 20p. It makes it rude not to shop really, My fave purchase from this section has to be the Dovecraft Fairytale Princess clear stamp set for 50p and yes i did say set and 50p.


Many items here are from the under £1.00 section, i really can't believe the quality of the products for the price.

As i continue to browse the options i keep adding more to my basket and even though it seems like a lot in items it's not a lot in price!


Punches for 50p Ink pads for £1.00 and what has to be my fave purchase in anticipation of my big shot arriving, my first die from Tonic Studio for yep you guessed in £1.00

All in all i spent £31.00 including £4.95 shipping and received 35 items, all in all i am absolutely over the moon and once the tremors stop i am off to play with my gorgeous new toys.

It may of been the first time i have ordered but it won't be the last. All in all items, price, packaging and speed of shipping was 100% from beginning to end. You can shop with confidence on this amazing website, so what are you all waiting for??? Go shopping :-0 


Tuesday 6 May 2014

Standing theater card tutorial

I am so glad the bank holidays are over for a few weeks again, they always throw me out with my days! I do love spending them crafting though and have made one or two pretties over the weekend.

I especially love the card i am going to show you how to make, it looks really complicated but in fact is rather easy to make and it looks beautiful when finished.

What you will need to get started

1 sheet of A4 card
Ruler
Craft Knife
Cutting mat
Pencil
6x6 Papers, here i used Lily rose papers free with cardmaking inspiration this month.
Double sided sticky tape.
Paper trimmer
Embellishments
Inks
Rubber stamp
Perspex block
Foam pads


My free gifts in this issues Cardmaking Inspirations. A rubber stamp set and papers from Lily Rose 


Start off by taking your sheet of A4 card and your ruler, pencil and craft knife and turn to landscape view.


Start by trimming the card so it measures 14cm from top to bottom in landscape view.
Then measur 4 lines from top to bottom at 4.9cm, 9.9cm, 19.9cm and 24.9cm along that go to 14cm like shown above and score these lines (i use a craft knife and ruler but you can get scoring boards for this)

Next measure along the top and bottom marking up 2.4cm, 12.4cm. 17.5cm and 27.4cm then measure 2.5cm lines downwards and upwards along the top and bottom and score the 2.5cm lines. Then between the top of the 2.5cm lines cut through to make a slit in the card at both the top and bottom.


After all the measuring, scoring and cutting fold like this above, it can be a bit fiddly but it should end up looking like this.


After you fold both sides your card should stand like this :-)


Now you have a base for your decorations :-0 


Firstly i start by cutting my backing papers to fit the panels you want to cover, here are the bits you will need. When choosing your papers fiddle about and see what colours work well with each other.


You will need 2 pieces for the center measuring 9.8cm x 8.7cm and 8.7cm x 7.8cm
For the panels on the side cut 4.7cm by 8.6cm and for the small pieces cut 3 pieces 4.6cm x 2.3cm.


Back with double sided tape and start layering up and attaching to the card.


You can see how it starts to build up, i decided to stamp the center panel with the beautiful lily rose stamps using Tim Holtz Distress Ink in Faded Jeans and Yinks Pink Ink to give it a 3d effect on the paper. You can decorate you card however you wish, there are so many options for these cards.


Here is my finished card stamped up, embellished up and ready to give to someone.
Also used Woodware Craft collection Punches for top hearts and flowers,
Poundland flowers, dragonfly's and heart gems.

Let me know if you give this a try i would love to see your versions ;-) xx


Thursday 1 May 2014

Slimming world chicken Korma amazinggggg!!

I love food i'm the first to admit it and i am the girl that will give anything a try! Thai, Chinese, European, Japanese, Mexican, Indian and so on in a range of meats and seafood.

I'm back on the fat club plan and really enjoying it wont have my first weigh in till next week sadly but hey ho never mind!

I have recently discovered this amazing recipe for quick and easy Chicken Korma

Ingredients 

Chicken Breast
1.5 tbsp Korma Spice Mix
1 Mullerlight Greek style coconut Yogurt 
1/2 Chicken stock pot
Onion 
2 Large Mushrooms
1/2 Pepper Colour optional
1/2 Cup Frozen Peas
Salt
Rice
Frylight


Firstly chop up all your Chicken, Mushrooms and Onion into nice chunky pieces, then add the chicken and onion to a hot pan sprayed with frylight and cook for 5 mins halfway through adding the korma spice. 
Cook rice as usual ready to serve with the Korma.


Add the 1/2 stock cube to the pan undiluted and add 70ml of boiling water stirring till the stock has broken down.


Then add the Mushrooms, pepper and peas and cook for another 4 mins,
remove from the heat and stir the coconut yogurt into the mix and serve.


Absolutely amazing!!!